|
|
|

 Inside Mount (IM)
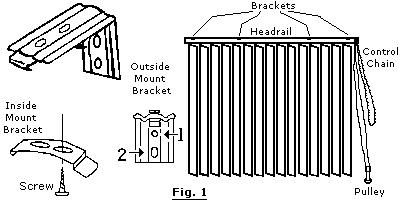
With this type of installation the vertical headrail will be mounted within the window frame. Provided, are installation clips for the appropriate width of track. Blinds up to 52" require two clips - one at each end four inches from the end. Blinds over 52" will require three or more clips spread equally across the width of the headrail as well as the ends for added support. (Fig. 1)
Clips are placed up into the ceiling of the window frame (Fig. 2)using one screw in the hole closest to the flange at back. The hole in the clip for the installation screw must be at least 2 1/4" away from the window, the wall, or any other projections to allow full vane rotation. Depending on the type of window casing (wood, drywall, metal) plugs may be needed. Please refer to (Fig. 7) for preparation of the valance (if included) which must be installed at the same time as the mounting clips. When valance is prepared, hold it up to window making sure it is centered, screw the screw up through the back hole of clip(Fig. 1) about 1/2" from back edge of valance and up into the window ceiling. Repeat for all other clips and tighten screws before attaching headrail.
Outside Mount (OM) (Fig. 3)
This type of installation is designed for hanging the vertical blind
on the wall or outside the window frame. - Using the outside mounting brackets provided
(Fig. 1) follow these steps:
Looking at your sales order, use the measurement you provided
for that blinds height and add 1/4" to it. (82" = 82 1/4"). Placing your tape measure on the
floor covering, pull tape upwards to top of window/door and make a mark at the proper
height (your window height plus 1/4") This mark is where the top screw goes(hole #1 in Fig. 1).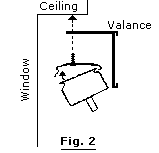
Position an installation bracket on the wall approximately 3-4" from each end of the headrail.
Insert a screw into the hole labeled 1 in the illustration and screw in the bracket.
Make sure the
top of the bracket is level and then insert a screw into the hole labeled 2 in the illustration.
This is the anchor hole, and it prevents the bracket from moving.
Place additional brackets equally
across the width of the headrail.(Fig. 1)
The clip release flange goes toward the wall or window.(Fig. 3)
Tighten all screws so the brackets are securely mounted before attaching the headrail.
2. Installing the Headrail
Determine which side you want the control chain and traverse cord (Fig. 6) to hang from. Center headrail to mounting clips. Insert the front lip of the headrail into the groove at the front of the clip, and then rotate the back of the headrail
up until it snaps into the back of the clip. (Fig. 3) Repeat this procedure for each clip.
To remove the headrail, push up on the
release flange at the back of the clip. You may have to use the tip of a screwdriver to push the release flange. (Fig. 3)
3. Attaching the vanes (PVC)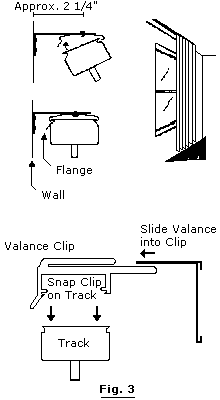 Pull the traverse cord so the vane holders spread out evenly across the headrail.
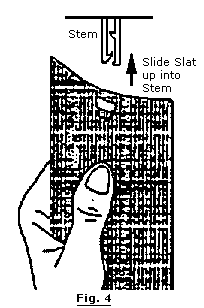
Then, rotate the chain so the openings in the stems face toward you. (Fig. 4)
Hold the vane near the top to support it and gently push the vane up into the holder (stem). Gently pull the vane down a bit to make sure it locks into the hook (tooth of stem) (Fig. 4)
Attach the vanes so all curves, seams, or patterns face the same direction.
If fabric vanes are used, the same procedure applies for attaching to headrail. Fabric vanes come with a small weight that is inserted into the bottom pocket of the vane. They also have a plastic hang clip sewn into the top of the vane which will snap into the holder just like PVC vanes.
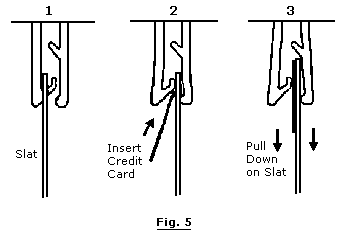
4. Removing the Vanes (Fig. 5)
When you want to remove a vane, slide a credit card or something similar up the vane on the hook side of the vane holder. Then slide the vane and card out (down) from the vane holder.
Do not persist in pulling if the vane does not slide out easily. Make sure the vane is not sliding back onto the hook. The card must interrupt the hook to be effective.
5. Mounting Tension Pulley (Fig. 1)
The pulley is to be attached to the bottom baseboard or wall. There are two holes in the base of the pulley where screws are used to attach to wall or inside window frame. Once the pulley is secured put the loop of the vertical cord in through the top part of the pulley. The top part is the part that is spring loaded. Locate in the headrail of the vertical track two knotted ends of the traverse cord. Choose the knotted end farthest away from the traverse cord and chain and pull out until the tension pulley becomes taut with a slight pull on the string. Mark the cord at this point in the track with a marker or pencil. Release the traverse cord from the tension pulley. Pull the cord out once more to marked location and tie a knot here. Put loop back into tension pulley and traverse verticals open and closed. If verticals work properly you can now cut off excess cord below the knot. Note: if you tie a knot in the wrong string the vanes wont traverse properly, so please test it's function before cutting the excess cord.
6. Vertical Blind Operation (Fig. 6)
Rotate the vanes by pulling the chain until the vanes are in the desired position. Always rotate the vanes with the chain to the open position before you traverse the blind with the cord. If you ever need to align the vanes, rotate them from front to back (180 degrees) by pulling the chain once in each direction. This procedure will automatically realign the stems. Pull the traverse cord to open and close the blind. Note: the vanes will jam if you try to traverse them while the blind is closed.
7. Vertical Valance (Optional)
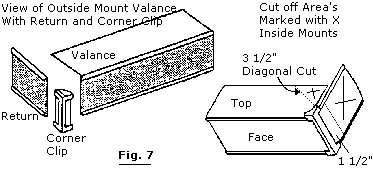
The valance can be used on both inside and outside mount blinds. (Fig. 7)
For outside mount there are plastic valance clips (Fig. 3) that snap onto the top of the headrail. Space them out evenly just like the mounting brackets for the headrail and then slide the top of the valance in between the front two prongs of the valance clip. Attach corner clips and returns. Returns may need to be cut to fit flush with wall.
For inside mount - heavy duty scissors or tin snips will be needed. The valance is approximately 2" wider than the window opening. At this point cut out a 3 1/2" diagonal piece at each end. When the cuts have been made snap on the clear corner clips with the returns. The returns need to be cut to about 1 1/2" long, plus or minus depending on window depth. Hold valance up to window with one hand, put screw gun or screw driver in other hand with screw and clip (Fig. 2) on tip ready to fasten. Tighten screw up in through valance into top of window about 1/4" from back of valance edge. Tighten screw and snap track into place. You can now go back to step 2 and complete the installation.
Note: Most of our verticals are self-correcting - if your blinds don't seem to be closing all the way, simply pull on the cord first in one direction then the other (pulling until it won't go any further). You may need to do this several times in both directions - but that will usually correct the alignment.